
Any person or company can get a Crunchbase profile—and it’s free.
If you follow my steps below, you’ll have a great shot at seeing your Crunchbase profile outrank negative links that show up when you Google your name and/or business.
I’ve broken this post into three easy to follow steps, to teach your how to:
- Add a profile
- Add your websites (organizations)
- Promote everything using Crunchbase “Press References”
Ready to get started?
Let’s go!
- Step #1 – Add and Edit a Profile on Crunchbase
- Step #2 – Create and Edit a New Organization
- Step #3 – Create a New Press Reference
- My Completed Crunchbase Personal and Organization Profiles
- Summary
Step #1 – Add and Edit a Profile to Crunchbase
This will be easy to follow if you’ve got a two screens side-by-side.
Leave this window open on your left screen, then click this link to get started and move it to the screen on your right: https://www.crunchbase.com/add-new
Begin by choosing “Person” to create your personal profile.
Then continue to edit your profile.

Edit Your Profile
After clicking Person, you’ll see a screen with lots of blank fields, like the screenshot below.
Fill in everything!
The more stuff you fill in, the better your completed profile will look and the higher it is likely to rank on search engines.
Follow along below to learn how to optimize each field.
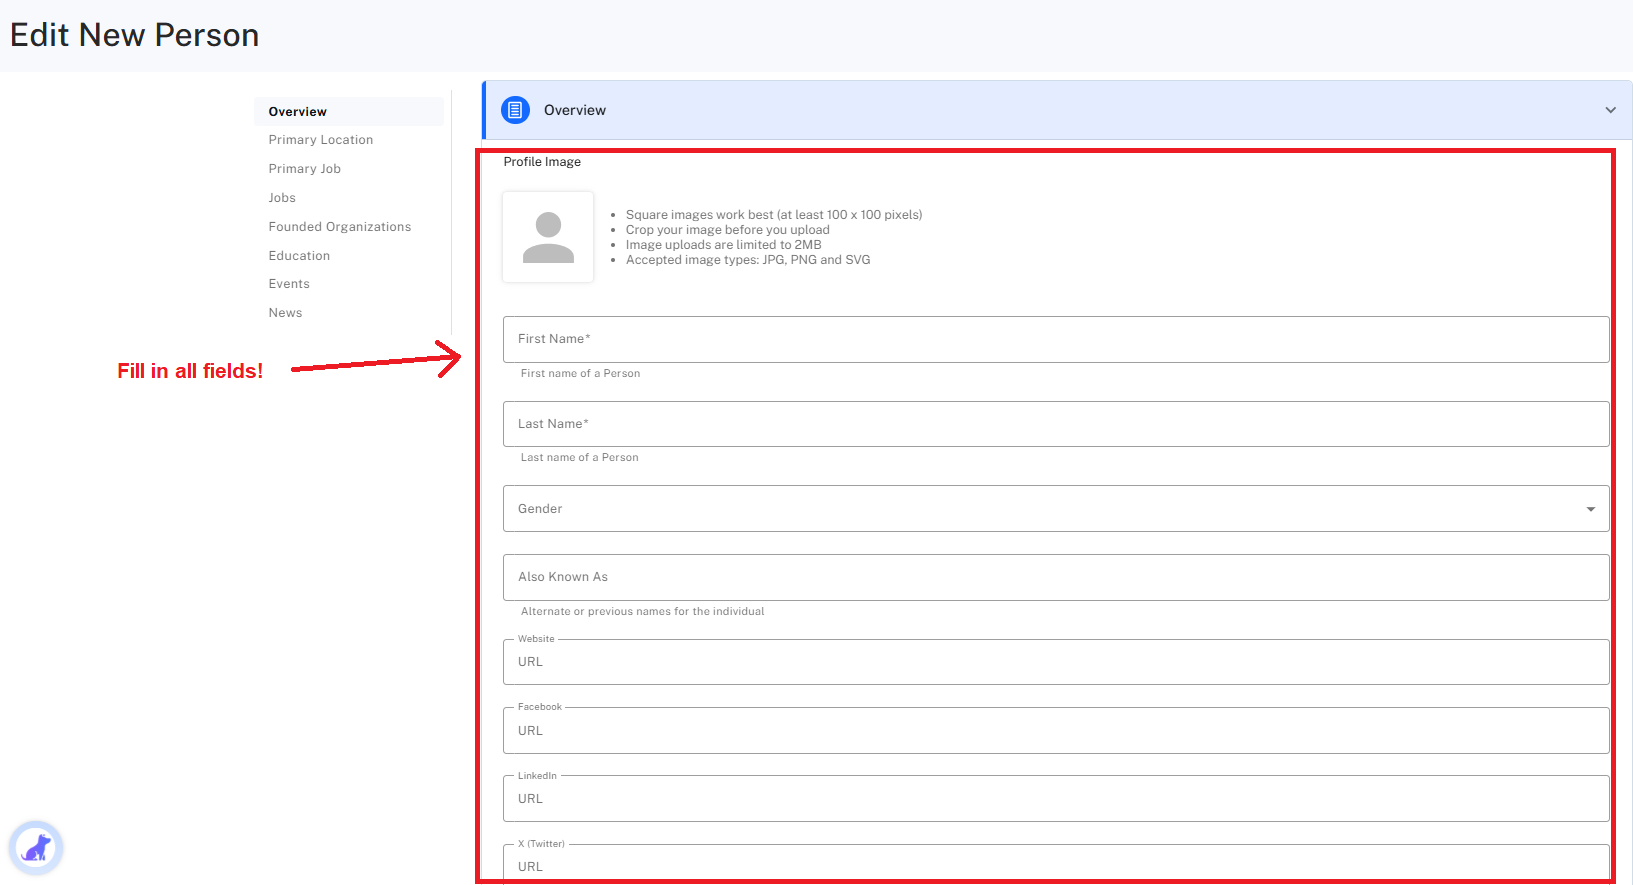
Optimize each field in your Crunchbase profile
Profile Image – Add a nice picture of your beautiful smile.
First Name/Last Name – put your most used first name/last name combo. For me, most people know me as “Mike Munter,” so that’s what I put.
Gender – Choose one.
Also Known As – this is a good place to put one or more varieties of your name. I put “Michael Munter” here. If you go by multiple names and Google searches for those bring up negative stuff about you, I recommend including all of those variations of your name here. For example, if your name is John Doe, but negative stuff also appears for John C. Doe, and Jonathan Doe, put them all.
Website – If you have a business website with a page about you, put that exact URL here. Otherwise, put one of your exact-match or partial-match domains here.
Facebook/LinkedIn/Twitter – If you’re following my advice, you will already have claimed these high-ranking social media profiles. Put those links in!
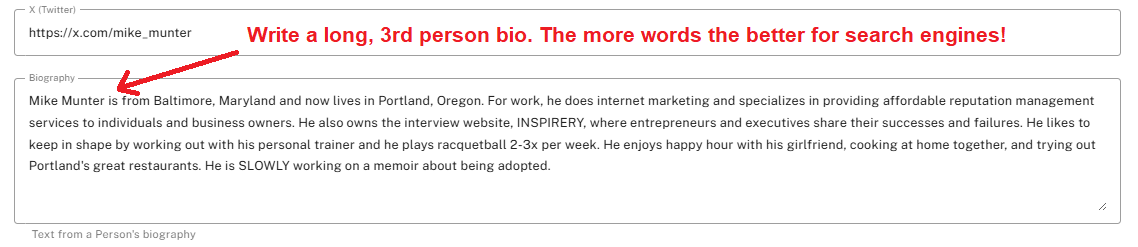
Biography – Make it as long as you can (longer is better) and be sure to put it in 3rd person. Here’s mine.
Primary Location – Put where you live.
Primary Job & Jobs – If you want to fill these in you can. Not having them isn’t going to hurt the strength of your Crunchbase profile. I searched for a former company I used to work for (Global Spectrum, now Spectra Venue Management) and it wasn’t listed, so I skipped it.
Founded Organizations – Here’s where you can add those exact-match and partial-match domains you’ve bought and built.
If you’ve already created your profile, you can skip ahead to learn how to create & edit a new organization.
But if you’re just starting out and haven’t got a saved profile on Crunchbase yet, do not skip ahead.
You’ll see why later.
For now, continue to the next field: Education.
Education – If you finished college or trade school, search for it here and select it/them. Then continue to fill in all of the fields for your degree details.
Events – you can skip this.
News – If you already have a saved profile, then you can go to learn how to create a new press reference.
But, until you have completed and saved your initial profile, don’t do this yet.
Save Your Edits
Click the button to Save All Edits.
It might take a day or two for Crunchbase to publish your profile, or it might happen automatically.
Your completed profile will have a URL structure like this: https://crunchbase.com/person/your-name
After your link is live on the site, go back to it and now you can add organizations and press releases and interviews about you.
Step #2 – Create and Edit a New Organization
I assume most of you reading this are doing it for your personal reputation management and if you’ve already created your exact-match and partial-match websites following my magic bullet strategy, this is where you can supercharge them.
Whether you own a business or just own a website, you can setup each one as it’s own entity, by following these steps.
Start by clicking Company and follow the rest of the fields per below.
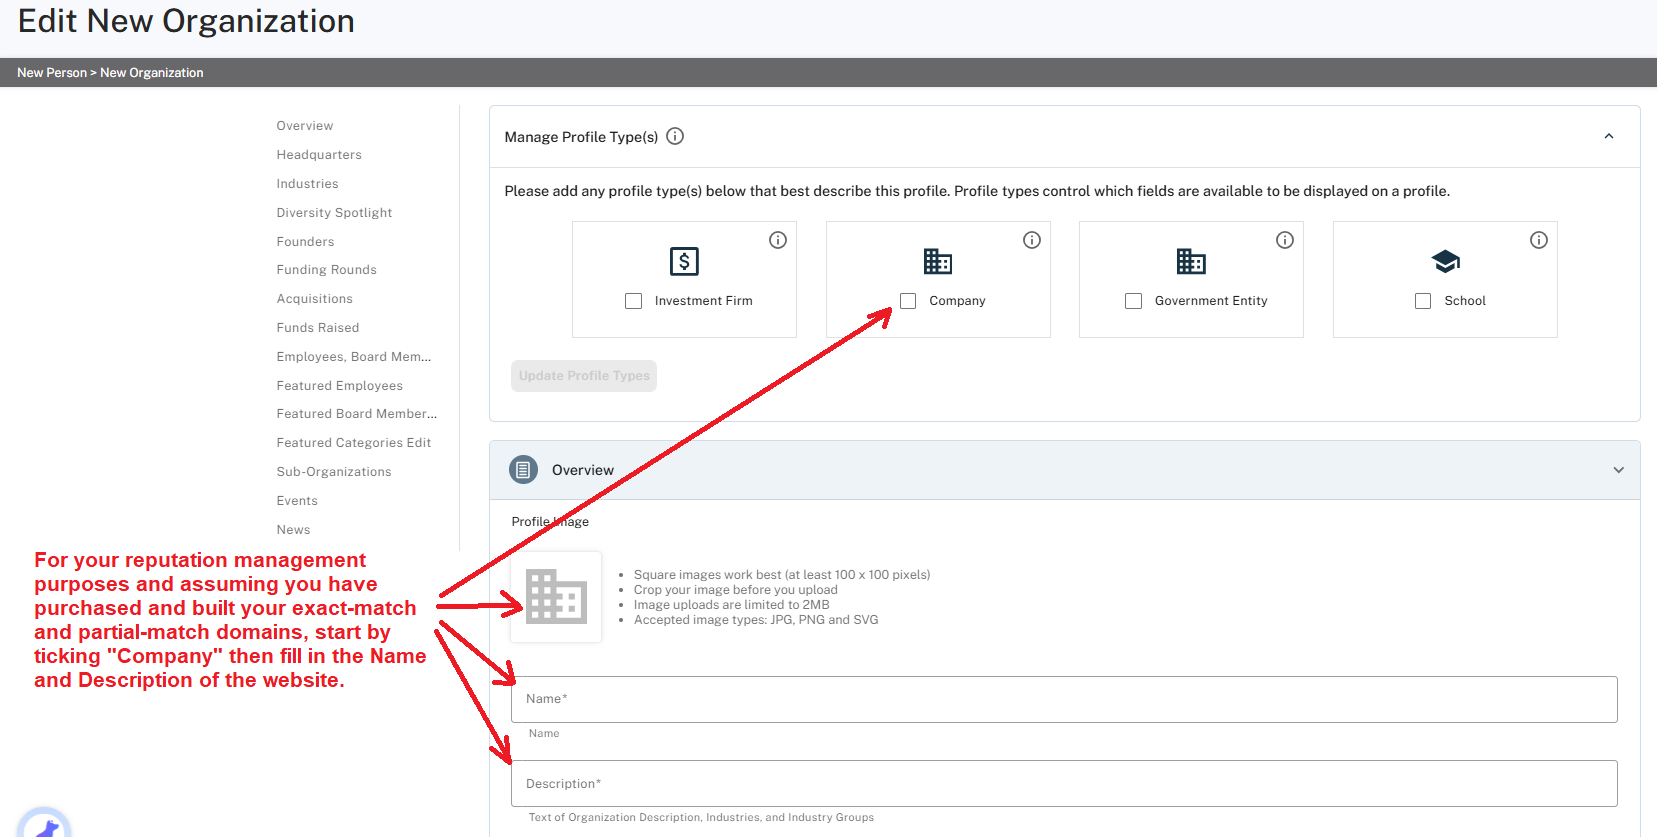
Company – check the box
Profile Image – add a logo or image from the website
Name – add the name of the site, for example, if your website is johndoetravels.com, then the name is John Doe Travels.
Description – put the description of the website, i.e., John Doe Travels is a travel blog featuring the places John Doe has visited. It includes pros, cons, and reviews of John’s favorite destinations.
Also Known As & Legal Name – you can skip these.
Founded Date – Enter your website into whois.com and it will give you the date the domain was purchased. Fill those out in the appropriate fields.
Closed Date – skip this.
Number of Employees – select 1-10 from the drop down, assuming it’s just your website.
Website – this is where you put johndoetravels.com.
Facebook, LinkedIn, X (Twitter) – these will just be your individual social media links
Contact Email & Phone Number – You can leave these blank or populate with an associated email and phone. If it’s an actual business, add these, but if it’s just one of your domains, you can leave these blank.
Full Description – Here’s a field you should fill with a longer description of what the website is about. Start with your Description from above and add more to it. Aim for 4-5 sentences.
Headquarters, Industries, Diversity Spotlight – if you’re an individual, skip these. If it’s an actual place of business, fill them in.
Founders – You will need to choose your name from the drop-down, but you can’t do this until you’ve completed and saved your profile. So, come back to this later.
Funding & Executive Fields – You can skip all of these:
- Funding Rounds
- Acquisitions
- Funds Raised
- Employees
- Board Members
- Advisors
- Featured Employees
- Featured Board Members and Advisors
- Featured Categories Edit
- Sub-Organizations
- Events
News – Wait until you have already created and saved your organization, then skip ahead to learn how to create press references in your personal profile and organizational profiles. For now, just save your newly created organization.
Now that you’ve added one website as an organization, repeat the process for each one of your domains.
Then continue with editing your personal profile above.
Step #3 – Create a New Press Reference
Press references are links to your other online content.
On your personal profile, this is the perfect spot to add your:
- Online interviews
- Press releases
On your organizational profiles, you’ll add your:
- About page from that website
- Your blog posts from that site
Adding these links on your personal and organizational profiles gives each one a little extra “link juice” to help it rank higher on Google.
Adding Press References To Your Personal Profile
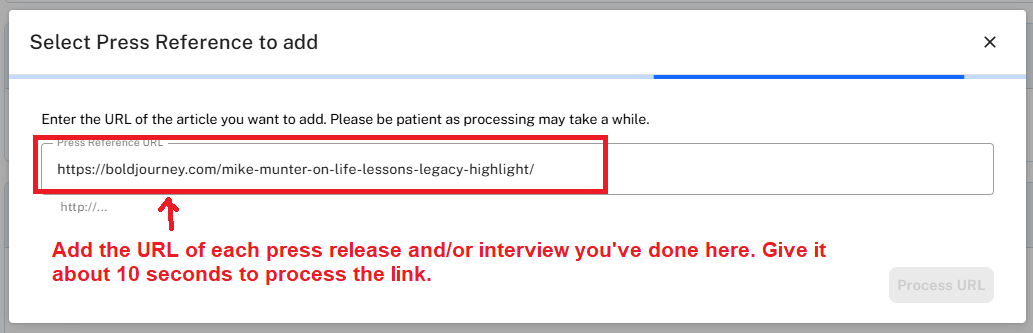
After you insert the link and press the “Process URL” button, give it a few seconds to process.
Then you will see a screen like this one below.
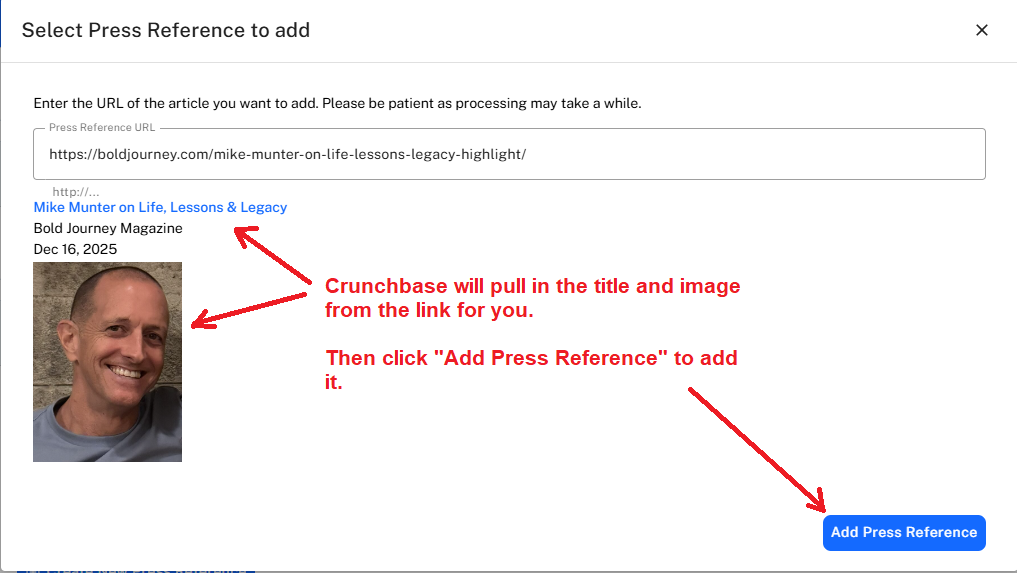
Now, click the bright blue button – “Add Press Reference.”
A new screen will open up titled “Edit New News.”
The title, press reference link, publishing date, publisher, and thumbnail will all auto-populate, assuming Crunchbase can find them.
You can manually edit anything that’s missing.
One last thing to do is to tag yourself in the “Mentions” box at the bottom.
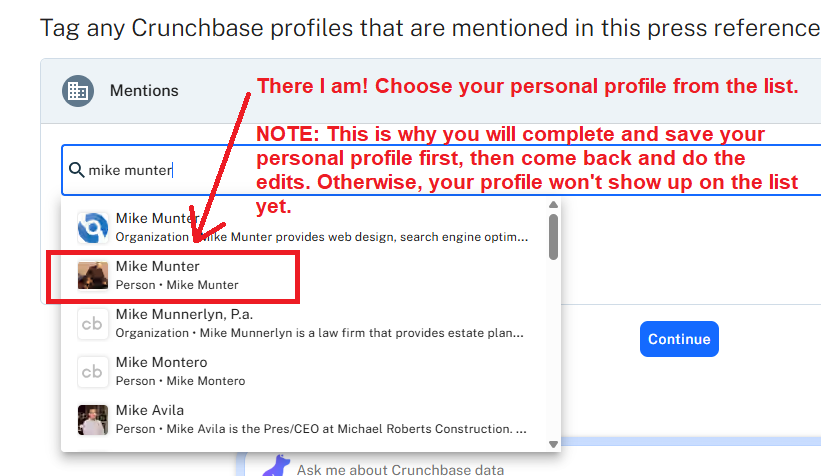
IMPORTANT – Make sure to hit “Save your edits” in the upper right hand corner of the screen as you go, so you don’t lose anything.
For certain links (or videos), Crunchbase may show this error message in red: The URL does not contain a valid article. If you believed this to be an error, please reach out to support@crunchbase.com for assistance.
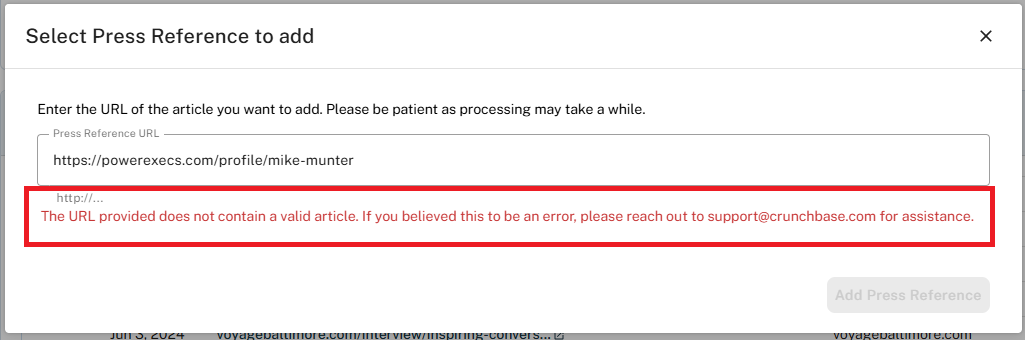
Don’t fret.
You can email support@crunchbase.com if you feel it’s an error, or you can just move on to the next link.
Now, move to the next step to add press links to your organizational profiles.
Adding Press References To Your Organizational Profile
Remember that for you as an individual, an organization = a personal exact-match or partial-match domain.
If you also own business websites, these are also considered organizations by Crunchbase.
You will create a unique “organization” or “website,” just as if each one is it’s own business.
After you open up the Crunchbase link to your specific organization, scroll to the bottom and click “Create New Press Reference.”
Then proceed to add a link to each of the individual blog posts from your website.
Do this for as many blog posts as you have on the website; it will help them rank better on Google.
You can also add a link to the “About” page from the site to give it a little extra push, too.
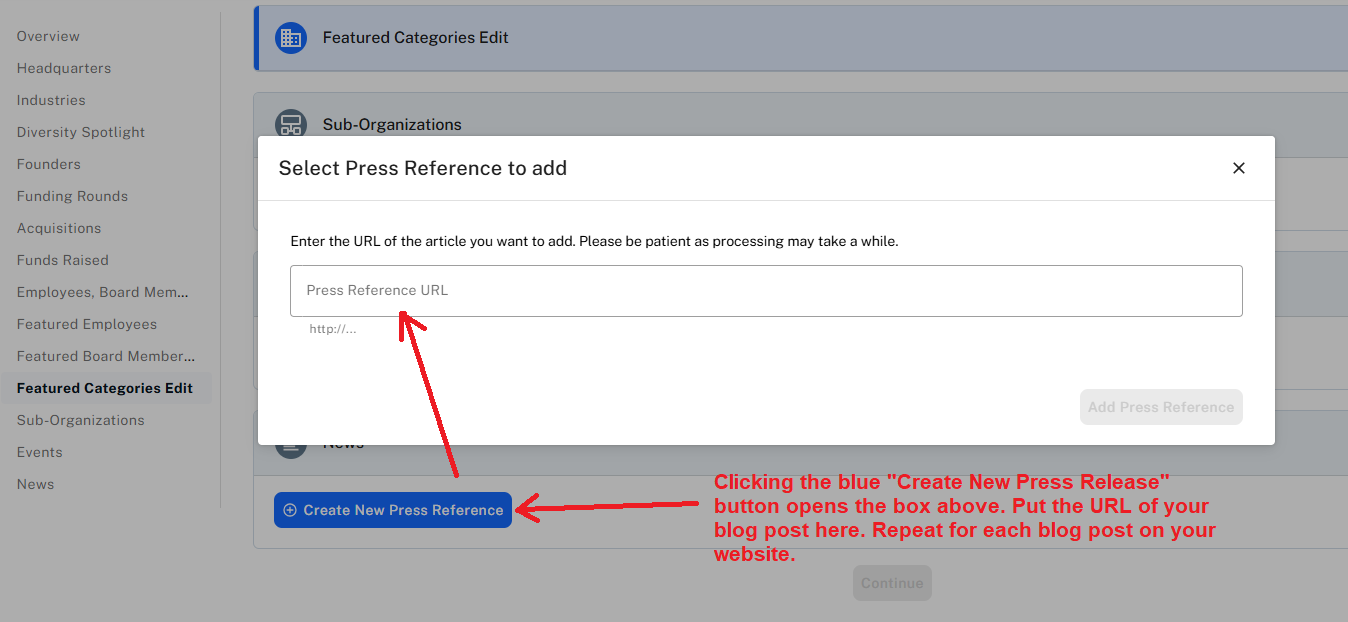
Repeat this process for each one of your websites.
If you’d like to see how my completed Crunchbase profiles look, please keep reading.
My Completed Crunchbase Personal and Organization Profiles
Here’s a link to my personal profile: https://www.crunchbase.com/person/mike-munter
And here’s a link to my organizational profile for Affordable Reputation Management: https://www.crunchbase.com/organization/affordable-reputation-management
Summary
Your crunchbase profile gives you two strong assets to help with your online reputation management:
- Your completed profiles will rank well in Google search results
- Your press reference links boost other pieces of online content in search results
There is no need to pay for the bells and whistles on Crunchbase.
As you keep publishing more things about yourself, you’ll want to keep coming back to Crunchbase and add that content in your press references, so everything gets stronger.
I hope this post has been helpful and remember we are here to do the work if you would rather us handle the workload.
Feel free to reach out if you have questions.